Showing posts with label arkham asylum / arkham city / arkham origins. Show all posts

Friday, 7 June 2013

Bat Freak: The Riddler Post Part II

This Friday Edward Nygma has taken over the Friday Feature / Minx Review spot!
 

First things first (to set the scene) a playlist:
 
Enigma from rachel.yelding on 8tracks Radio.
  1. The Riddler - Frank Gorshin
  2. Bad Days - The Flaming Lips
  3. The Riddle - Nik Kershaw
  4. This Ain't a Scene, It's an Arms Race - Fall Out Boy
  5. Mack the Knife - Bobby Darin
  6. You Sexy Thing - Stereophonics
  7. Mannequin's Theme - The Curse OST
  8. That Don't Impress Me Much - Shania Twain
  9. Need You Tonight - Inxs
  10. Badman - Cory Branan
  11. Li'l Red Riding Hood - Sam The Sham & The Pharaohs
  12. Big Bad Wolf - The Sham-Ettes
  13. That's the Trouble with Love - Frank Gorshin
  14. Loverboy - You Me At Six
  15. Just Be Good To Green - Professor Green featuring Lily Allen
  16. VCR - The XX
  17. Perfect Day - Lou Reed
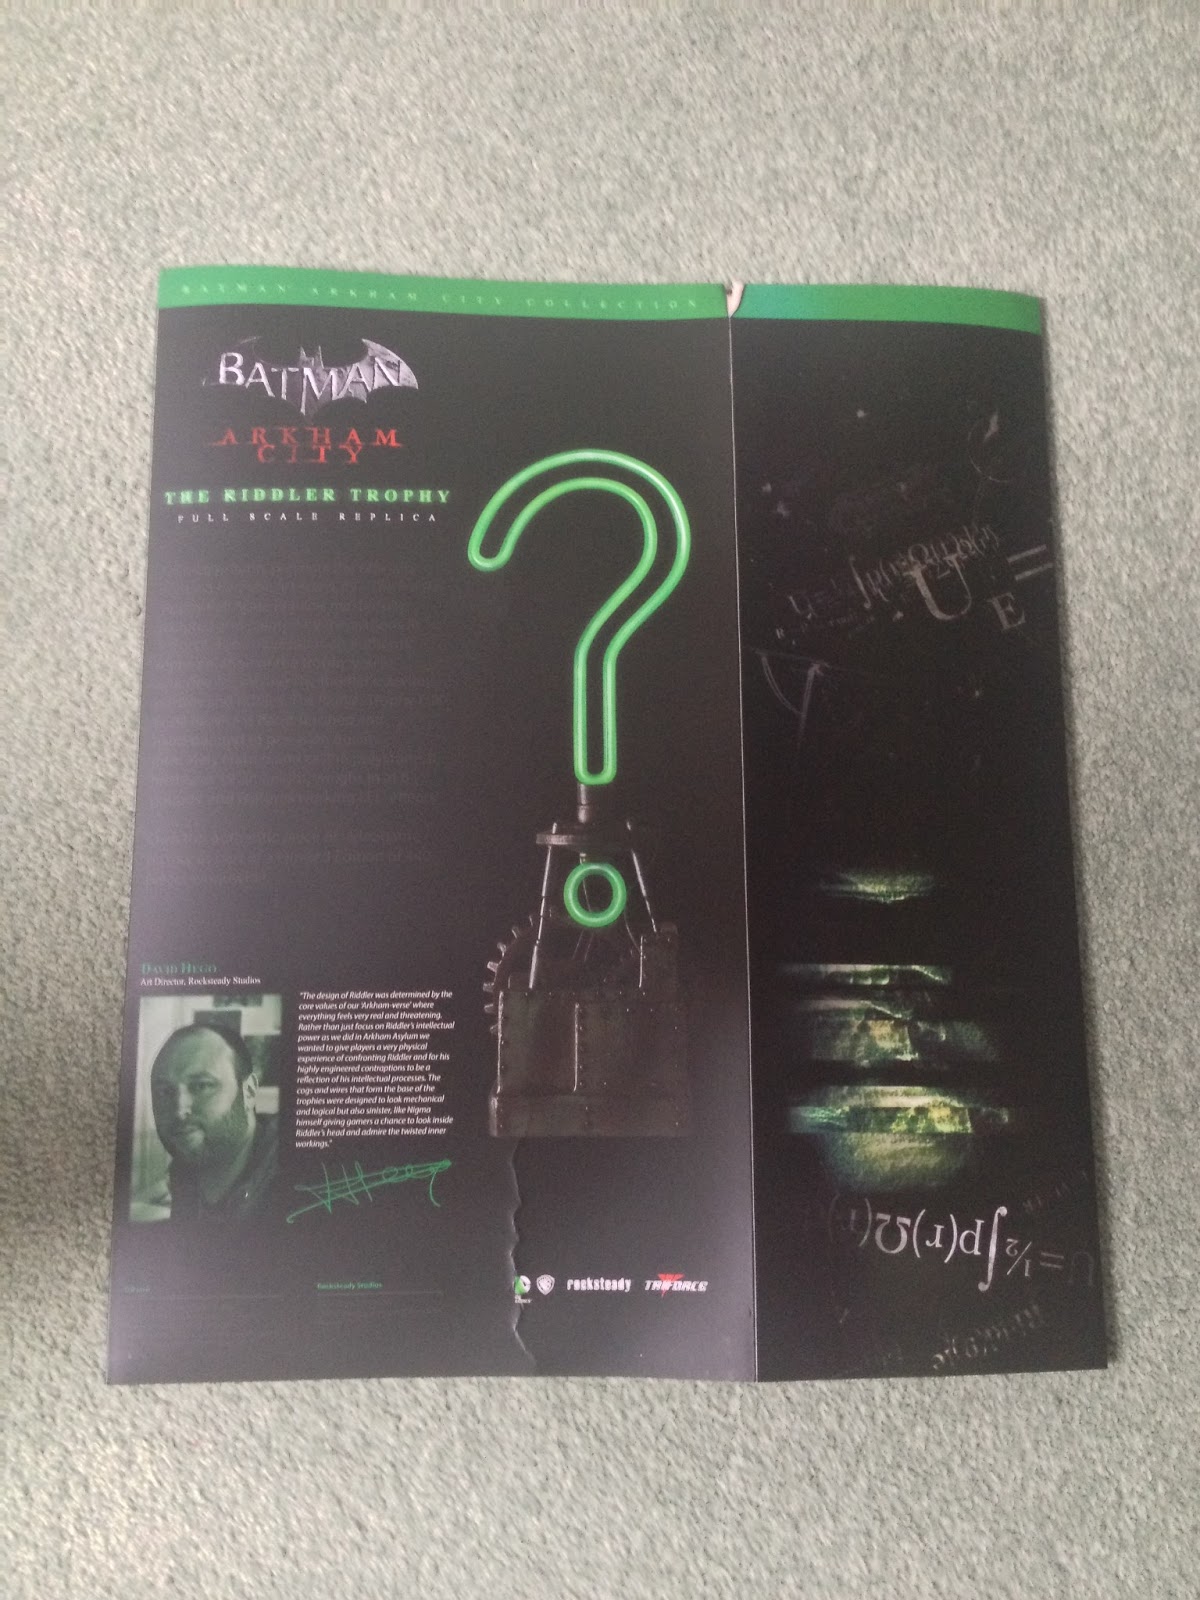
Secondly my full scale sized replica Riddler Trophy arrived yesterday! Here is what it should have looked like (click the photos for hi-res versions - blogger is being bratty about resizing photos):
 

And here are copious amounts of fanatical photos of what it did look like:


You can plug it into the mains but you can also plug it into your computer because...you're a geek...and if it doesn't come with a USB connection you're not interested ;-)

Also the big question at the moment is will Riddler be in Arkham Origins? Well according to May's cover of Game Informer magazine yes he will...(good luck spotting the clue though).


And now Enchanted Blogging will be returned to its usual service.
 

Thursday, 21 March 2013

The Versatile Award

Super lovely Blythe of Blue Roses has nominated me for the Versatile Award! Thank you Blythe!
 
 
The rules are:
  1. Nominate some other bloggers
  2. Let them know you have nominated them
  3. Share 7 random facts about yourself
  4. Thank the blogger who has nominated you and link back to them in your post
  5. Add the Versatile Blogger Award to your post
My nominations:
 
I haven't filled all my slots for the Liebster Award yet - once I have then I'll nominate for this one!
 
7 random facts about me:
  1. I always play computer games on 'easy' the first time through so that I can enjoy the story without worrying about getting stuck on the game play.
  2. I own every Minx comic published.
  3. My top five played songs are: Lullaby covered the Editors, Shoelaces by The Submarines, You Sexy Thing covered by Stereophonics, Pursuit of Happiness covered by Lissie and Mein Teil by Rammstein.
  4. I LOVE cookery competition shows!
  5. My bedroom is bright amaranth.
  6. I really dislike my legs - you'll never see me baring them above the knee.
  7. I think fingerless gloves teamed with rolled up sleeves looks UBER sexy on men! Nothing says, 'I mean business' than rolled up sleeves <3 Seriously, seriously hot! Even hotter when teamed with glasses too *faints* <3
What do you mean he looks like your creepy geography teacher?!

Saturday, 9 March 2013

D.I.Y. - Poison Ivy's Arkham Asylum Shirt

Hi guys, here is the second part of my Poison Ivy DIY! In this part I'll talk you through painting the Arkham Asylum symbol onto the back of your shirt (this tutorial works for any kind of stencil, not just the Arkham Asylum symbol).


1) Make sure you've followed PART ONE!

2) Design your stencil! To do this you'll need an image, cardboard (I used the side of a cereal box), glue, scissors / a craft knife and some toothpicks. If using scissors you may also need some tape.


If you wish to make the Arkham Asylum symbol into a stencil you can print off this one and stick it onto your cardboard. You can print off almost anything and make it into a stencil but remember the more complicated the picture the more difficult it will be to make the stencil! Of course you can also design your own stencil and if you're feeling brave you can draw it straight onto your cardboard. Once again remember the more complicated you make your design the more difficult it will be to cut it out!

The Arkham Asylum symbol is a complicated design as it involves letters with holes in which need to be magically attached.


3) Cut out the black bits. If you have a craft knife (only use one if you are old enough to and are confident with one) this shouldn't be too much trouble (remember to use a board so as not to damage the surface you are working on) however with a bit of creativity and blind faith you can also neatly cut out a fiddly stencil with scissors. If you are careful you can make extra incisions into the white of the stencil and then patch them up with the tape (I used a water proof tape and stuck it onto both sides of the stencil for extra security). For example the letters were far too thin and angular for me to cut them out smoothly. By making an extra incision into the white around each letter the scissors had more freedom of movement and could get into all the points.

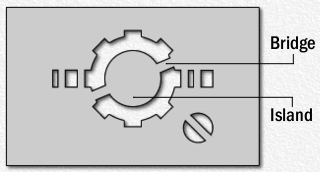
Remember I talked about magically reattaching the holes (they are officially called 'islands') in the letters? Well I taped thin lines cut from the scraps to create 'bridges'. Here is a much clearer example of what I mean. For extra sturdiness I used toothpicks on the big As.

When the stencil is completed it should look like this when held up to the light:


4) Paint your design onto the back of your shirt!


Spread your shirt out onto a piece of newspaper (so as to protect the surface beneath) - remember to undo the shirt! If you paint onto a buttoned up shirt the paint will go straight through onto the front! If you are painting onto a t-shirt put newspaper / card into the shirt to protect the other side.

Because my shirt was quite flimsy I pinned the stencil onto it to prevent extra folds. I put old padded envelopes between the shirt and newspaper for something for the pins to go into.

Paint on that stencil! I used Dylon Fabric Paint and a small everyday paint brush. Leave to dry.

Once dried you can apply another layer of paint to even the colour out. If you wish to paint with more than one colour paint each colour as a separate layer. Leave each layer to completely dry before painting the next.

Leave to dry again then remove the stencil.

5) Set the paint. This next step depends on the instructions of the fabric paint you used. With Dylon Fabric Paint you must iron the paint to make it permanent. Because my shirt is made of a thin material I put it between two tea towels when I ironed it. Don't use a steam iron!

6) Wear it! Wear it! Wear it!


The cat is called Freya. She actually belongs to the people across the road but prefers it with us lol
 
 
For extra Poison Ivy touches wear the shirt over green and with floral accessories (especially in your hair) though of course all of Batman's greatest foes end up in an Arkham Asylum shirt at some point in their lives so you could also match it with colours and symbols worn by any of your favourite villains!
 
P.S. - I haven't forgotten about my short comic tutorial - I just haven't finished my character designs for the next stage yet. D'oh!

Wednesday, 27 February 2013

D.I.Y. - Trimmed Shirt

Hi guys! Here is a really simple DIY to liven up a plain shirt for dirt cheap! I did this with an ox-blood (maroon) and blue for a very specific reason but monochrome is really popular at the moment and I think this make would look super effective in white and black such these shirts from River Island and Forever 21:

 
You will need:
  • a plain shirt (opaque or semi-transparent)
  • plain ribbon / binding
  • thread the same colour as the ribbon / binding
  • a tape measure to work out how much ribbon / binding you will need
  • a thin sewing needle and pins / a sewing machine
Steps:
 
1) Measure the areas of your shirt you want to line to work out how much ribbon you will need (always allow for extra just in case you make a mistake). I used a 1cm wide ribbon for the front of the shirt and collar and a 3cm wide for around the bottom. Whatever width you choose remember that you will only see half of it as the other half will have been folded round the hem of the shirt.
 
2) Make sure that your ribbon / binding comes as one long piece rather than in short lengths as it will look ugly where you join them. That means that if you are lining the collar and front like I did it will all be ONE piece of ribbon / binding.
 
3) Decide if you are going to use ribbon or binding. I used ribbon because binding didn't come in the colour I wanted. There are pros and cons to both:
  • Ribbon comes in more colours and thicknesses than binding
  • You do not need to hem ribbon
  • Ribbon can be cheaper than binding
  • Ribbon is made of stiff, artificial materials so can be awkward to sew, especially with a sewing machine
  • Binding is purposely designed to hem / line garments and can easily be applied using a sewing machine
  • Binding is not hemmed but is folded so that when you sew it you hem it at the same time
  • You can make your own binding from any cloth but it will not be hemmed and will not be folded - only do this if you are a confident sewer!
  • If you do buy ribbon make sure NOT to buy gift wrap ribbon. It is more expensive and is usually very plasticy / lined with metal so will be hell to sew with and make your garment rigid!
4) Trim your shirt! I hand sewed it because I don't trust myself on a sewing machine and used ribbon. I folded a small length of the ribbon around the hem so that it was equal on both sides of the shirt and pinned it. I then sewed it using a simple but neat back stitch:
 
 
I pinned it a little at a time instead of all in one go so that I didn't sew any bubbles and ruffles into the ribbon or shirt (which can happen if the materials aren't exactly lined up properly when you pin them).
 
 
When lining the collar remember the 'back' of your sewing (eg the messy side) will become the front (the neat side) which is why I say keep your sewing neat!
 
5) Hemming the ends of your ribbon / binding is the only really tricky bit. Fold the end of the ribbon in on itself so that your ribbon just meets the edge of your hem) and then sew it like the rest of your ribbon. It took me a few attempts to fold the ribbon to the right length. I then used some very tiny stitches to hold the end of the ribbon into place so that it didn't unfold itself whilst I focused on keeping the rest of it folded over the hem of the shirt.
 

And there you have one trimmed shirt!
 
CLICK HERE for how to turn your maroon and blue shirt into the shirt Poison Ivy wears in Arkham Asylum and Arkham City!

Sunday, 23 December 2012

Alternative Gingerbread Men

Somehow my Christmas turned alternative this year...possibly down to the construction of the Sasssquatch Wreath. As part of this alternative Christmas (please feel free to replace Christmas with whatever holiday it is you celebrate this time of the year) please allow me to introduce you to my alternative gingerbread men (plus the sacrificial gingerbread man made to stop mum's boyfriend eating the others during the night......):


Let's play a game! I'll show a picture of each gingerbread man before I show who it is supposed to be and you can see if you guessed right!

Hulk Hogan, brother!

A crime scene chalk outline

Matt Smith as the 11th Doctor Who (something weird happened to his trousers between icing him and taking his photo...I think he went back to the 80s and got them stonewashed!)

Robert Englund as a very happy Freddy Krueger (possibly went back in time with the Doctor...maybe time for Freddy v Doctor Who film?)
 

An Oompa Loompa

Pyramid Head from Silent Hill

Arkham City Riddler <3 <3 <3

Two Face

Zombie
 
This was lots of fun! I'd definitely like to make more! Maybe you guys have someone you'd like to see immortalised in gingerbread? I'd love to see your suggestions! I must say I'm quite tempted to do a whole batch of Batman gingerbread men. Let me know what you think!
 
Oh - and I'll leave you with a riddle from Gingerbread Riddler...


Monday, 3 December 2012

Holy Bat-Freak! Riddler Trophy Replica

I should be writing or something but £$^*$%*!!!! I bought this instead:


It's a scale size Arkham City (I guess Arkham Asylum too then) Riddler Trophy! It's actually much bigger than I thought a Riddler Trophy would be at 19 x 4 x 5 inches / 49 x 10.5 x 13.25 cm (H x W x L). That's pretty damn tall! Heaven knows where Batman stored them all...or how Eddie managed to fit them in all the places he hid them!

You can also buy a pink / red Catwoman trophy too!


There will only be 440 green Batman trophies made (hehe in-joke) and 100 pink Catwoman trophies. I suppose since the pink ones will be rarer I should of got a pink one...but Edward Nygma's my fictional crush not Selina Kyle...and I wanted a green one XD

Before you go, "OMG Rachel - what a waste of money!" I never spend this much on myself (and was feeling down) so I figure when something comes along that you really really want and you know will make you really really happy be it a Chanel dress, a BMW car, a piece of Kobe beef or a Riddler trophy...get it!

Check out more details of how to get your own at Triforce's official website.

Wednesday, 14 November 2012

Color Color / Own the High Street / Riddler Chic

I don't normally blog about fashion on the basis that I don't really follow trends (I prefer to set myself themes such as lolita, industrial, Johnathan Crane, Riddler, etc) and could lead you all horribly astray however as a UK lolita I know how difficult it is to find reasonably priced lolita or lolita-ish clothing in the UK so wanted to share my find with you...Color Color at Westfield London (the Shepherd's Bush one).

*Disclaimer: I've only visited Color Color the once so if, in five months time, you go and find it nothing like I've describe I apologise...best to go sooner rather than later so as to avoid disappointment*

Color Color sells two types of clothing; your more average high street fashion but also cardigans, blouses, jumpers (and knickerbocker style leggings) in black and pastel shades trimmed with fur, lace, bows, pearls, ribbons and flowers that would fit perfectly in any self-respecting classic lolita's wardrobe (but also good for casual, country and gothic lolitas).

When I went all items were half price (either the shop's shutting down, is having an uber sale or instantly marks items as sale items to get you to buy more) with each item averaging around £25 however I think even their non-sale prices of between £40-£50 are super cheap for lolita-ish clothing.

All items are one-size and I would say fit up to a UK size 14 (40-42). I'd say if you are a flat 16 (rather than a curvy 16) you might fit but I'd definitely recommend trying your chosen item on first to avoid disappointment later. I also recommend anyone with a bra size 36C or above to try on the button ups before buying as...as you will already know if you are curvy up top...button ups can gape.

In retrospect I wish I'd taken some pictures of the clothing I saw to back up my theory that they are suitable for part of a lolita outfit however here is a picture of what I bought (the collar is lace-lined and is detachable so you can wear the cardigan / jacket in spring too. The bottom thing is a pink and purple fur wrap):

 
And below are some pictures of me wearing it as part of a lolita outfit. This outfit is comprised completely of high street items to show that it is possible to recreate an expensive / unique / subculture style even if you are on a limited budget / cannot sew (the other alternative) / aren't one of those girls who has a wardrobe crammed with Metamorphose, Baby the Stars Shine Bright, Angelic Pretty, *name your favourite brand* clothing thanks to the bank of mum and dad. You just have to learn to be selective and diligent. I know how hard learning to be selective can be - it took me a long time to learn what I could and couldn't pass off as lolita and some lolitas who can afford wardrobes full of the real McCoy can be very cruel...especially with that pesky phrase 'ita' (horrible term - never use it - we were all new to the style once).


Flora crown - Primark
Cardigan / jacket - Color Color
Blouse - Monsoon
Skirt - Joules Boutique (via John Lewis)
Tights - Accessorize (though you can get a variety of thick, coloured tights from most high street stores now - I really recommend Dorothy Perkins and Pretty Polly)
Mary Jane shoes - Rocket Dog

Of course once you learn how to take high street items out of context you can create any style you like, be it completely unique to you, inspired by your favourite subculture (steampunk would be fun to try to achieve), inspired by your favourite celebrity or even by your favourite character. I really recommend learning the basics of sewing too. You can then make basic alterations that can instantly transform a piece that everyone has into something that is completely yours. If you become really brave you can even try making a whole item from scratch - I made a dress inspired by the design of Scarecrow Year One. If not it's okay. Below are two nearly completely high street sourced looks inspired by my great fictional crush and role model Edward Nygma / Nigma aka Riddler:

 
Bow - Claire's
Glasses - Vogue (via Boots - I'm a speccy four eyes so need to wear them however I know you can get pretend glasses at the fraction of the price should you be so inclined)
Necklace - Etsy (great source of unique and themed fashion)
Shirt - H&M
Dress - Dorothy Perkins
(I also usually wear purple tights with this from DP and purple shoes from M&S)


Accessories are the key for this look (otherwise you just look like a girl wearing a tie lol). If I ever get braver I will add a few question marks to the jacket or a big one on the back!
 
Hat - Urban Outfitters
Tie - Primark
Jacket - H&M
Satchel - H! by Henry Holland (via Debenhams)
Gloves - Billy Bag London (via TKMaxx...as a devotee of Arkham City Riddler I nearly wet myself when I saw these beauties)
 
Of course to wear themed outfits you have to be confident - people will feel it is their right to tell you that you look weird / call you names / laugh at you / stalk you - but it is your right to wear whatever you like and you will also find that there will be people who think you look damn cool and wish they were as brave / stylish as you. At first I needed the confidence to wear these clothes in public but wearing them now makes me feel confident and happy to be me...because basically they are me. Fashion is out there to be worn. The high street is out there to be owned.
 
If all else fails you can be a super geek and take photos of yourself in your themed outfit in dumb poses in the mirror XD

 
P.S. if you liked this post and would like to see more please let me know. I don't really think I'm qualified to tell people how to dress but I do have a few homemade items (such as the scarecrow dress), lolita outfits and general confidence tips that I would be happy to share :-)
Related Posts Plugin for WordPress, Blogger...